Add products by adding codes
Installation and Construction Instructions Ultrasonic Levitation - DIY KIT - Levitation - Experiment

Installation and Construction Instructions Ultrasonic Levitation - DIY KIT - Levitation - Experiment
You dream of conducting fascinating experiments with levitation - at home, at school or in a workshop? Thanks to Ultrasonic Levitation DIY KIT you can build your own levitator step by step and see how the sound... lifts objects in the air!
This project is not only fun - it's also a great way to learn the basics of electronics, ultrasonic waves and soldering.
🔸 What is ultrasonic levitation?
Ultrasonic levitation is based on the phenomenon of standing wave. Between the ultrasound transmitter and the reflecting surface (or second transmitter) is created resonance cavity.
In this space, emitted and reflected waves overlap, creating areas where acoustic force is generated - enough to counterbalance the effect of gravity for small, lightweight objects. As a result, the particles hover in the air - creating a remarkable levitation effect!
⚡ Kit specifications
Operating voltage: 12 V DC
Operating current: 0.5-1 A
Dimensions: 44 × 40 × 66 mm
Operating temperature: -20 ~ +85 °C
Humidity: 0-95 % RH
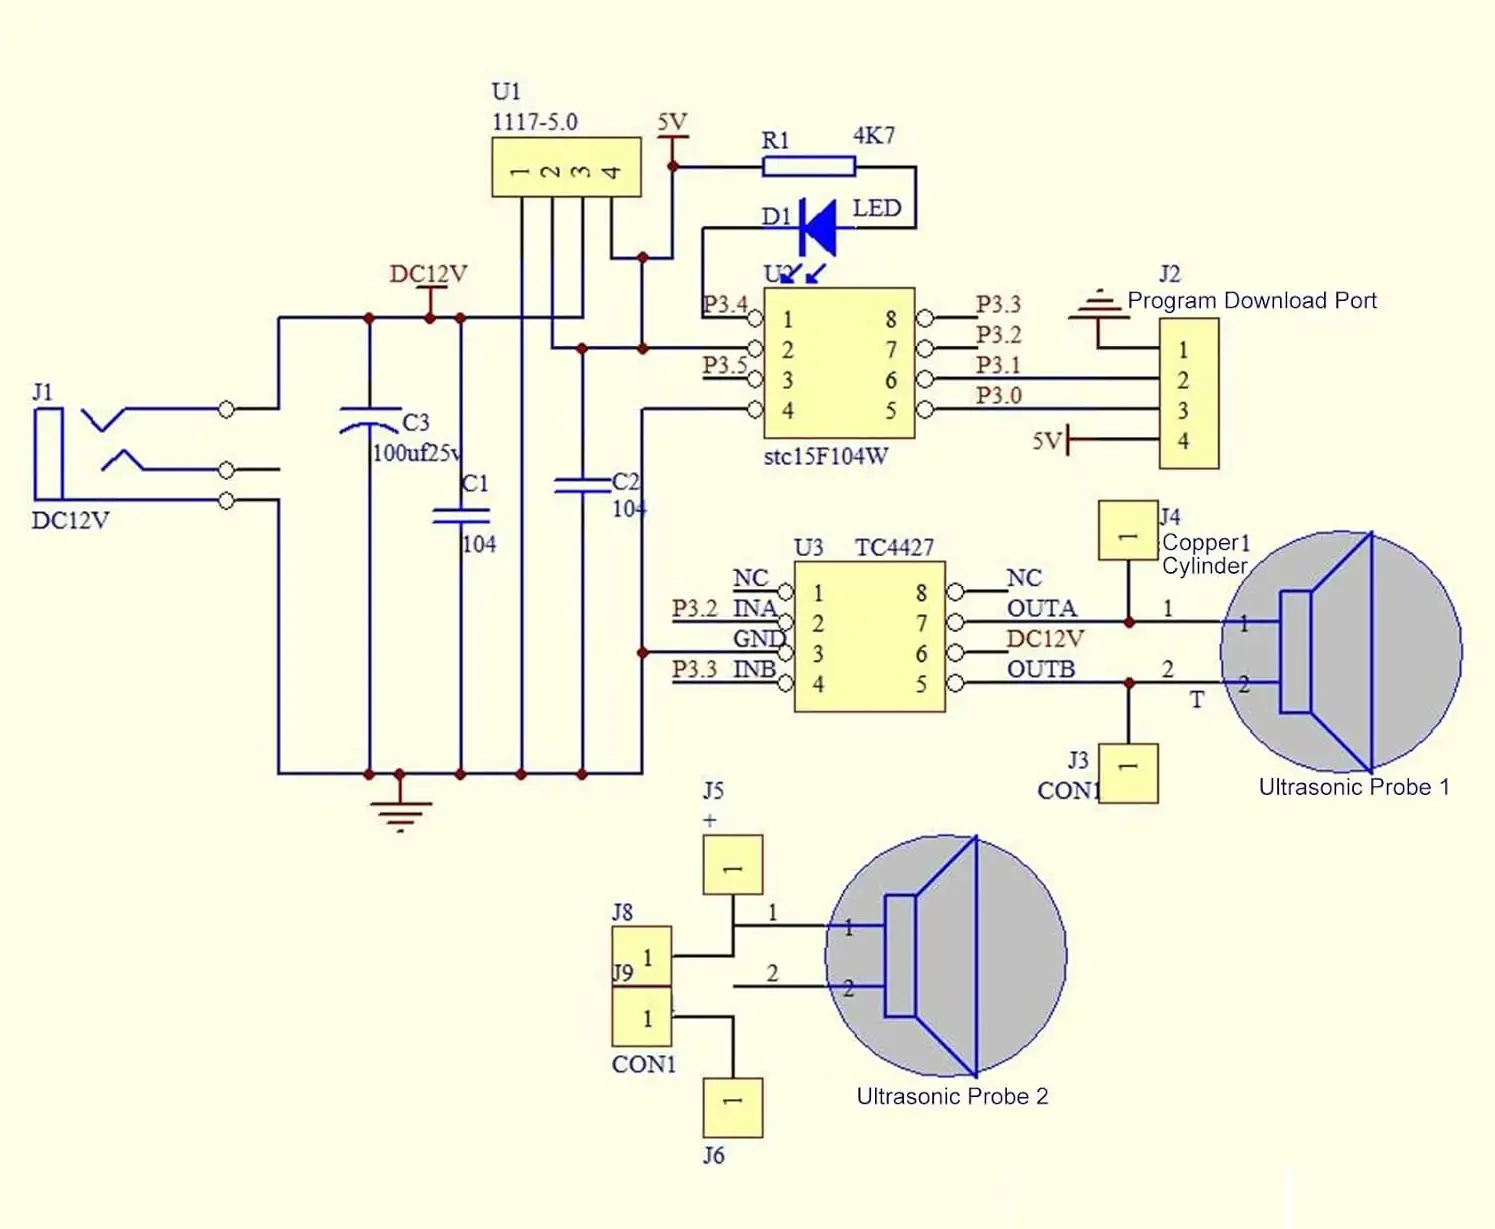
Scheme
📦 What the kit contains?
| No | Element | Quantity | Description |
|---|---|---|---|
| 1 | PCB board (bottom) | 1 pc | Power and control system |
| 2 | PCB board (top) | 1 pc | With ultrasonic transmitter |
| 3 | Ultrasonic transmitters | 2 pcs | Marked with a black box (+) |
| 4 | TC4427 integrated circuit | 1 pc | Controller |
| 5 | STC15F104 integrated circuit | 1 pc | Microcontroller |
| 6 | Layout AMS1117-5.0 | 1 pc | Voltage stabilizer |
| 7 | 100 nF capacitors | 2 pcs | Ceramic |
| 8 | Capacitor 47 µF / 25 V | 1 pc | Electrolytic |
| 9 | LED | 1 pc | Operation signaling |
| 10 | DC power socket | 1 pc | Standard input |
| 11 | 3.3 kΩ resistor | 1 pc | |
| 12 | M2 screws | 4 pcs | Installation of connectors |
| 13 | M4 screws | 4 pcs | Assembling the feet |
| 14 | Copper connectors | 4 pcs | Distances between tiles |
| 15 | Plastic feet | 4 pcs | Stable base |
🛠️ Step-by-step installation instructions
Step 1: Soldering SMD circuits
Install chips: TC4427, STC15F104, AMS1117-5.0.
Note the orientation of the circuits - pin 1 must match the marking on the PCB.
If you are inexperienced, you may want to watch the SMD soldering tutorial on YouTube.
Step 2: Assembly of THT components
Solder 100 nF ceramic capacitors.
Add an electrolytic capacitor 47 µF / 25 V (pay attention to polarity).
Solder a 3.3 kΩ resistor and a DC socket.
Step 3: Assembly of the upper elements
Solder the LED (longer leg = "+").
Attach the ultrasound transmitters - they must be set up parallel and straight.
Step 4: Installation of the second tile
On the top board, solder the second transmitter.
After soldering, clean the board of flux residue.
Step 5: Assemble the structure
Attach the plastic feet to the bottom plate (M4 screws).
Fix the copper connectors (M2 screws).
Position the top plate opposite the bottom plate - the transmitters must be exactly opposite each other.
Screw and make sure the structure is stable.
Stage 6: Commissioning
Connect the 12 V power supply.
The LED should light up.
Gently place small balls (such as Styrofoam) between the tiles - they should float in the air!
⚠️ Safety and operating instructions
Don't touch the transducers during operation - they can get hot.
Do not exceed 12 volts.
Store the set in a dry place.
Use very light objects (such as Styrofoam balls).
Avoid drafts - wind can disrupt levitation.
✨ Why you should?
✅ Learn soldering and electronics basics
✅ Learn about ultrasonic waves in practice
✅ Ideal educational tool for schools and hobbyists
✅ "WOW" effect - The floating balls are very impressive!
📚 Summary:
Ultrasonic levitation kit is a great opportunity to combine learning and fun. This simple but effective design would be perfect for a DIY studio, school or as a unique gift for a new technology enthusiast.
👉 Check out the product in the store: Ultrasonic Levitation DIY KIT
Recommended