Add products by adding codes
W3001 Programming Manual - W3001 Temperature Controller
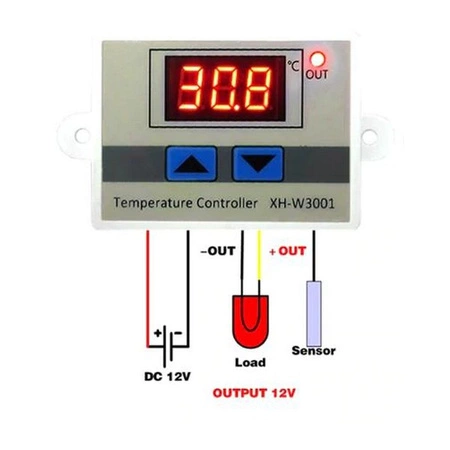
How to program the W3001 temperature controller? Operating instructions and setup examples
Temperature controller W3001 is one of the most popular, inexpensive and easy to use electronic thermostats. It is available in two power versions: 12V DC (for power from power supplies, batteries, etc.).) and 230V AC (directly into the network). Thanks to its universal design, it can operate in both heating, as well as cooling, controlling devices such as heaters, fans, circulating pumps, heating mats or even small refrigerators.
In this article you will find w3001 detailed programming manual, principles of operation and practical examples of settings for various applications.
How to Program the W3001 Temperature Controller: Step-by-Step Guide
Introduction
Welcome to the W3001 temperature controller programming guide! This popular and reliable thermostat, while sophisticated in operation, is surprisingly simple to set up. The purpose of this manual is to guide you through the process step by step, in a clear and understandable manner.
The entire setup is based on the use of just two buttons: ▲ (top) and ▼ (bottom). This makes programming the device extremely easy, even if you have no prior technical experience.
Before You Start: Understanding Heating and Cooling Mode
Before you set specific values, you need to understand the most important principle of the W3001 controller: its operating mode (heating or cooling) depends solely on the relationship between the two set temperatures - T1 and T2. Correctly defining this relationship is crucial to the proper operation of your system.
Heating mode (set T1 < T2)
This mode is used to control heating devices such as heaters, mats or heating cables. The device will turn on, when the temperature drops to the T1 threshold, the shuts down, when it reaches the target temperature T2.
- Example (heating the aquarium to 25°C):
- Set T1 = 24.0°C (heater switch-on temperature).
- Set T2 = 25.0°C (heater off temperature).
Cooling mode (set T1 > T2)
This mode is designed to control cooling equipment, such as fans or chillers in refrigerators. The device will turn on, when the temperature rises to the T1 threshold, and the shuts down, when the environment is cooled to T2.
- Example (cooling components with a fan):
- Set T1 = 40.0°C (fan start-up temperature).
- Set T2 = 35.0°C (fan off temperature).
Hint: Set the Hysteresis
Never set T1 and T2 to the same value. The difference between these temperatures, called the hysteresis, prevents the unit from continuously turning on and off at the temperature limit. This protects the connected equipment from wear and tear. The recommended interval is at least 0.5°C - 1.0°C.
--------------------------------------------------------------------------------
1. Step 1: Set the Start-up Temperature (T1)
T1 is the temperature threshold, which initiates the action. In heating mode, this is the lower limit (the device will turn on, when the temperature drops to T1), and in cooling mode - the upper limit (the device will turn on, when the temperature rises to T1).
To set this value, follow the steps below:
- Press and hold button
▲(top) for about 2-3 seconds. - Watch the display - it will start flashing, signaling the entry into T1 programming mode.
- Use the buttons
▲and▼, to set the desired switch-on temperature. - After setting the value, do nothing and wait a few seconds. The controller will automatically save the new setting and return to the current temperature display.
After successfully setting the start temperature, it's time to configure the shutdown threshold.
--------------------------------------------------------------------------------
2. Step 2: Set the Off Temperature (T2)
T2 is the target temperature at which the connected device is to turn off turn off, completing the work cycle.
The process is almost identical to the previous step, but this time you will use the second button:
- Press and hold button
▼(bottom) for about 2-3 seconds. - When the display starts flashing, it will signal the entry into T2 programming mode.
- Using the buttons
▲and▼set the target shutdown temperature. - Again wait a few seconds, for the controller to save the setting and exit programming mode.
Now that both temperature thresholds are in place, it's a good idea to check that they have been saved correctly.
--------------------------------------------------------------------------------
3. Step 3: Check Settings and Finalize
Completing the configuration means making sure everything is set up as planned and preparing the device for stable operation.
Quick view of stored temperatures
You can check stored values at any time without entering edit mode.
- Short press button
▲will display the stored switch-on temperature (T1). - Short press button
▼will display the stored shutdown temperature (T2).
Best practice: Reset the device
After making new settings, it is recommended to reset the controller. This is a simple action that ensures that the controller will start working with the newly entered parameters. To do this, simply unplug the device from the power supply for a few seconds and then plug it back in.
Your controller is now properly configured and ready to operate!
Recommended