Add products by adding codes
Electronics basics and arduino practical course #5

- What is Arduino?
- Arduino UNO
- The first project
- Programming in the Arduino IDE
At a glance Arduino is a platform (family) for embedded systems. Arduino and individual modules,components are like building blocks that just need to be assembled properly and you have the finished result almost immediately. If you want, to start your Arduino adventure with top quality products then take a look at here
1. Arduino logo
In addition to the original products Arduino, there are still clones on the market, some of better comparable quality to the original, others of inferior quality.

2. Arduino UNO clone
If you are going to make uncomplicated projects to start with, then the uno or nano clones will suffice as completely as possible.
Also take a look at the official Arduino project website, https://www.arduino.cc/ You'll find lots of helpful articles there, and be sure to download the free Arduino IDE from this site, which you'll use to program, the microcontroller on your computer by connecting to the module via a USB.
Once you have sourced an Arduino board UNO, which is the most popular format Arduino, let's take a look at its output.
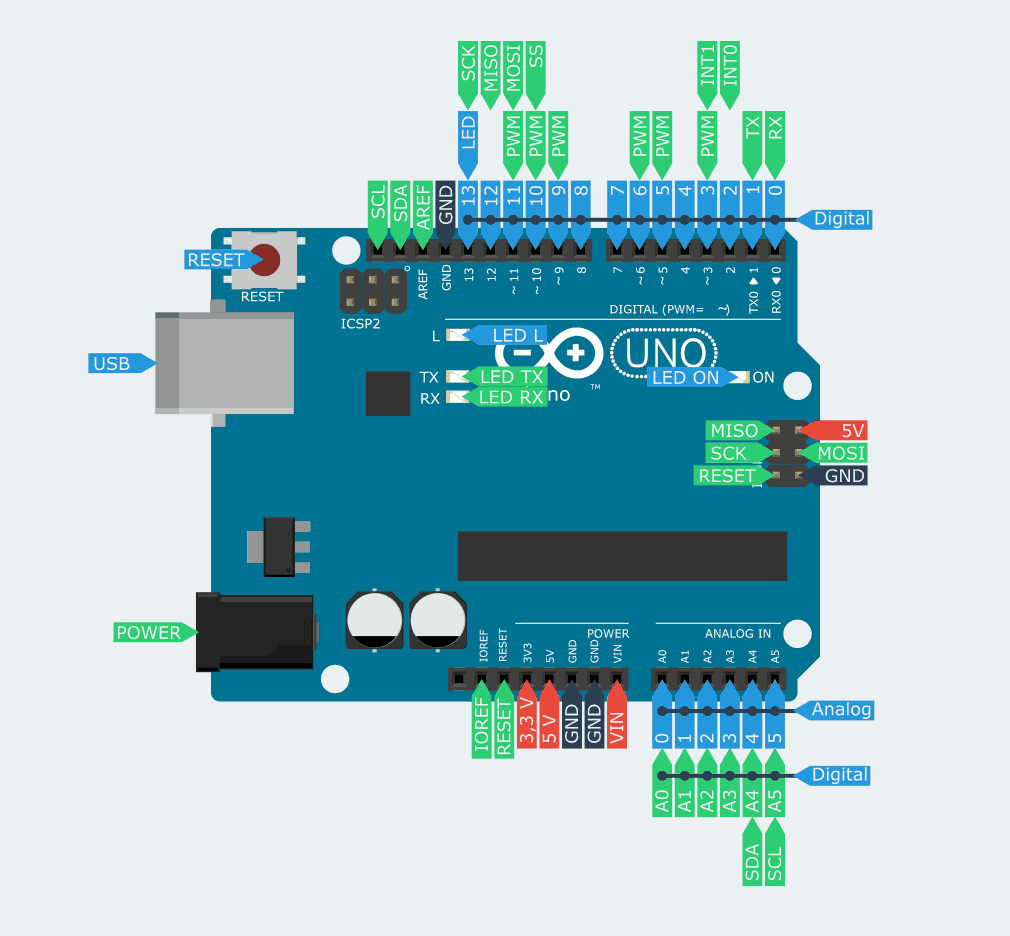
3. Arduino UNO pins
To begin with, the operation of the module may seem complicated, but it is actually very simple. The board has two main types of outputs digital and analog. On our board, the analog pins are at the bottom, while the digital uppermost.
Of course there are also power, GND, Reset pins. Power supply and USB port are on the left, pins on the right ICSP. - It stands for In-Circuit Serial Programming. They are used to program the board. We can program the module in three ways:
- programming via USB (Arduino IDE, but not limited to),
- programming by the aforementioned ICSP,
- i programming via UART
For USB programming, get a suitable cable connecting and install the module's USB driver, which you can download for free from the Internet.

4. Arduino Mega and USB cable
We will only program using the USB port and the ARDUINO IDE environment
Language Arduino IDE is similar to c++, so you need to know the basics of that language to create programs in the IDE. There are many additional libraries for the Arduino IDE, created under open source software licenses by thousands of hobbyists.
To start, we will make a simple design, with an LED connected and a resistor to protect the LED from too high a current.
Take contact plate,diode a luminous LED of any color, resistor about. 500Ω You'll find the materials you need here.
5. Diagram flashing diode
As you can see in the picture both, the power cables are connected to the pins of the board. The point is that the work of these pins, from which we use to power the diode, we can change - as we wish.
By writing a program to control these pins. Program is very simple, of the type "Hello world"
Rewrite, or copy, this program into the IDE and run compile. If the compiler detected any errors, the field at the bottom will contain red entries, if everything went well on the black field, you will see a message in white characters about the occupied memory.
Now let's figure out what, we did.
Language Arduino has two basic blocks:
void setup() {
}
void loop() {
}
When the program first turns on, it reads the setup function and gets the basic data and initial values from it, which the program then works on.
In our program in the setup block we have:
pinMode (led, OUTPUT);
the pinmode instruction sets the action of the pin either to the input INPUT, or output OUTPUT. At INPUT the signals are taken in, at OUTPUT the signals are sent to the connected device, in this case the LED
The second blog very important is the function loop (English. repeat) Function loop is nothing more than an infinite loop, which is a basic and probably familiar to you instruction of many programming languages The loop runs from the beginning, function loop reaches the end and again returns to the beginning and starts another circuit.
What's next for features
In the functionand loop we have:
digitalWrite (led, HIGH);
delay (1000);
digitalWrite (led, LOW);
delay (1000);
- digitalwrite (PIN, STATE) - this instruction gives a high or low state to the PIN output, that is, we have a high state on the 7th pin, that is, current flows through it.
- delay (time milliseconds) - a very simple instruction that does nothing else - like stops, the operation of the program for the given number of milliseconds. In our case, the program stands for 1 second in each delay call.
I think you have figured out or have already figured out how the program works instruction by instruction.
To start, we pass current to the diode, then the program does nothing for a second and we turn off the diode current and also for a second the program stops, then the circuit repeats and continues until we turn off the circuit.
Very simple right? In the next section we will move on to already more advanced projects.

